Getting Started with Layouts
Auto groups have been renamed Layouts.
What are Layouts?
A layout is a structure that can be applied to one or more objects to style them with padding and background color, or organize them into horizontal or vertical groupings.
Use these Layouts on your pages to create flexible (responsive) designs that can grow, shrink and reflow. For example:
- Apply a horizontal layout to a set of buttons to create menu or button strip.
- Apply a vertical layout to a set of text objects to organize them together and manage the width and spacing.
- Nest layouts together to create more complex components like cards that require a mix of Horizontal and Vertical layouts.
Layouts can be applied to one or more objects. Combine (nest) layouts together to create complex layouts and wrapping layouts.
Layouts in Pagecloud are based on CSS Flexbox and are quite similar to Figma’s Auto Layouts. If you are familiar with either of those then you’ll love Layouts in Pagecloud.
Layouts can be used in both Auto and Manual columns.
Layouts are included in all plans.
Working with layouts
Apply a layout
A layout can be applied to one or more objects that are within the same column.
- First select one or more objects.
- Select the Layout tab in the Editing Menu.
- In the Layout tab under New layout for selection, select either the Horizontal or Vertical option to apply your new layout.
- The layout will be applied and you will see additional controls which are described below.
You can also use the following keyboard shortcuts to apply layouts:
- L H to apply a Horizontal layout
- L V to apply a Vertical layout
Tip! you can also use these to change the direction of a selected layout
Remove a layout
- Select a layout by clicking on it.
- Select the Layout tab in the Editing Menu.
- In the Direction controls click the Remove layout icon (furthest option to the right).
You can also use the shortcut R L to remove the layout.
Delete a layout
Empty layouts are automatically deleted.
To delete a layout and all of it’s contents:
- Select the layout by clicking on it or choosing it in the Edit menu breadcrumb (TODO: link to new article).
- Press Delete on your keyboard.
- You can Undo a delete if you change your mind.
Selecting objects within a layout
Object selection within a layout goes from biggest to smallest, meaning your first click selects the layout as a whole, the next click selects a layout within the layout, the next click selects the object within the layout (and so on depending on how many nested layouts you have created)
To select objects within a layout:
- Click the layout
- Click the object within the layout (or the layout within the layout) to select i
Tip! If you have an object in a layout selected and want to select the parent Layout, use the Breadcrumb in the Editing menu.
Sorting objects within a layout
Once you’ve created a layout, you can rearrange objects inside the layout. There are a few ways to do this:
Drag and drop
- Select the object you want to rearrange
- Drag the object to the new position you want it to have within your layout
- Release the mouse when the object is in the right position
Tip! With a layout selected the objects within have a center control point to help you quick sort objects without having to select them.
Using the Editing menu
- Select the object you want to sort
- Select the Arrange tab in the Editing Menu.
- In the Sortcontrols use the arrows to sort your selection within the layout.
Add objects to a layout
You can add an object to a layout in the following ways:
Drag and drop: This currently only works for objects that are not already part of a layout.
- Select the object(s) you want to add to the layout
- Drag them on top of the layout, the layout will highlight indicating you can drag them into the layout
- Release the mouse button to add the objects.
Using the Editing menu:
- Select the layout and the object(s) you want to add. Make sure you only select one layout or Pagecloud won’t know which layout to use as the destination.
- Select the Layout tab in the Editing Menu.
- Click the Add to layout button to add the selected objects to the selected layout
Need to edit an object inside the layout? Click once on the Layout to select it, and then click again to select one of its objects.
Removing objects from a layout
If want to remove an object from a layout, you have a couple of options:
Drag and drop: Currently in development and will be available soon.
Using the Editing menu:
- Select the object you want to remove.
- Select the Layout tab in the Editing Menu.
- Click the Remove from layout button to move the selected object into its parent object.
Duplicating a layout
If you need multiple layouts of the same style, it’s easy to duplicate your layout and swap out the content. to duplicate a layout:
- Select the layout you want to duplicate
- In your Editing Menu in the top right, click the duplicate icon
Layout settings
Direction
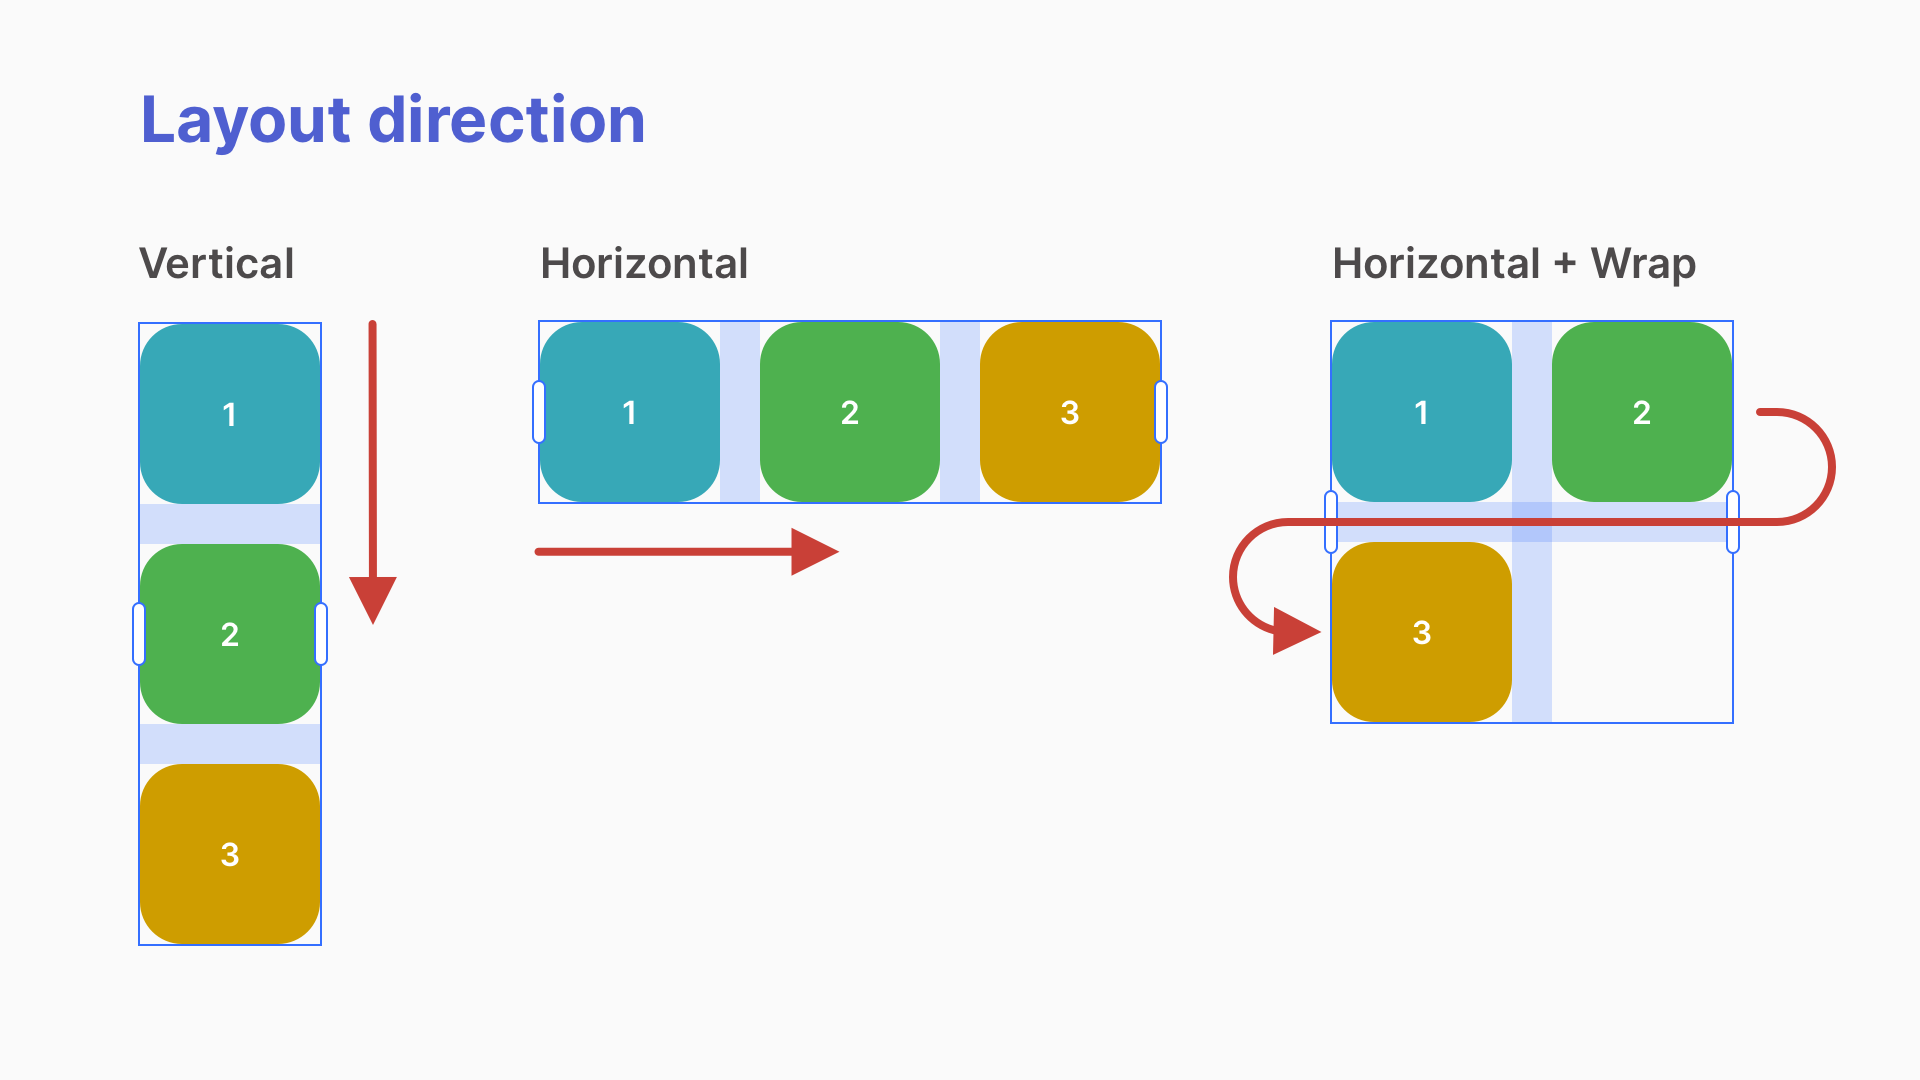
With Layouts, you can instantly adjust the direction of the objects in the group, making designing faster and more precise. This is helpful when you have many similar objects (such as social media icons or text) that you wanted to appear horizontally or vertically.
- Select a Layout.
- Select the Layout tab in the Editing Menu.
- In the section Direction, you can toggle between Horizontal or Vertical direction for your layout.
- Horizontal - All objects in the layout display side by side horizontally.
- Vertical - All objects in the layout display on top of one another vertically.
Each direction has a different set of align controls to manage the layout properties. Within each direction you can adjust the gaps between objects and the alignment of your objects.
Flexbox tip: If you are familiar with Flexbox, these are direction attributes.
Vertical Layout
Align
Align allows you to align all objects within the layout to the either the Left, Center or Right edge of the Layout.
Gap
Add a gap between objects in your layout.
Padding
Padding creates a border around your layout. You can use the slider or add a numeric value.
Flexbox tip: If you are familiar with Flexbox, these are align-items attributes.
Horizontal Layout
Horizontal layouts have more controls that vertical layouts. A horizontal layout allows you to control how objects align within the layout bounds, how objects within align and scale with each other, and if you want objects to wrap onto multiple lines.
Align
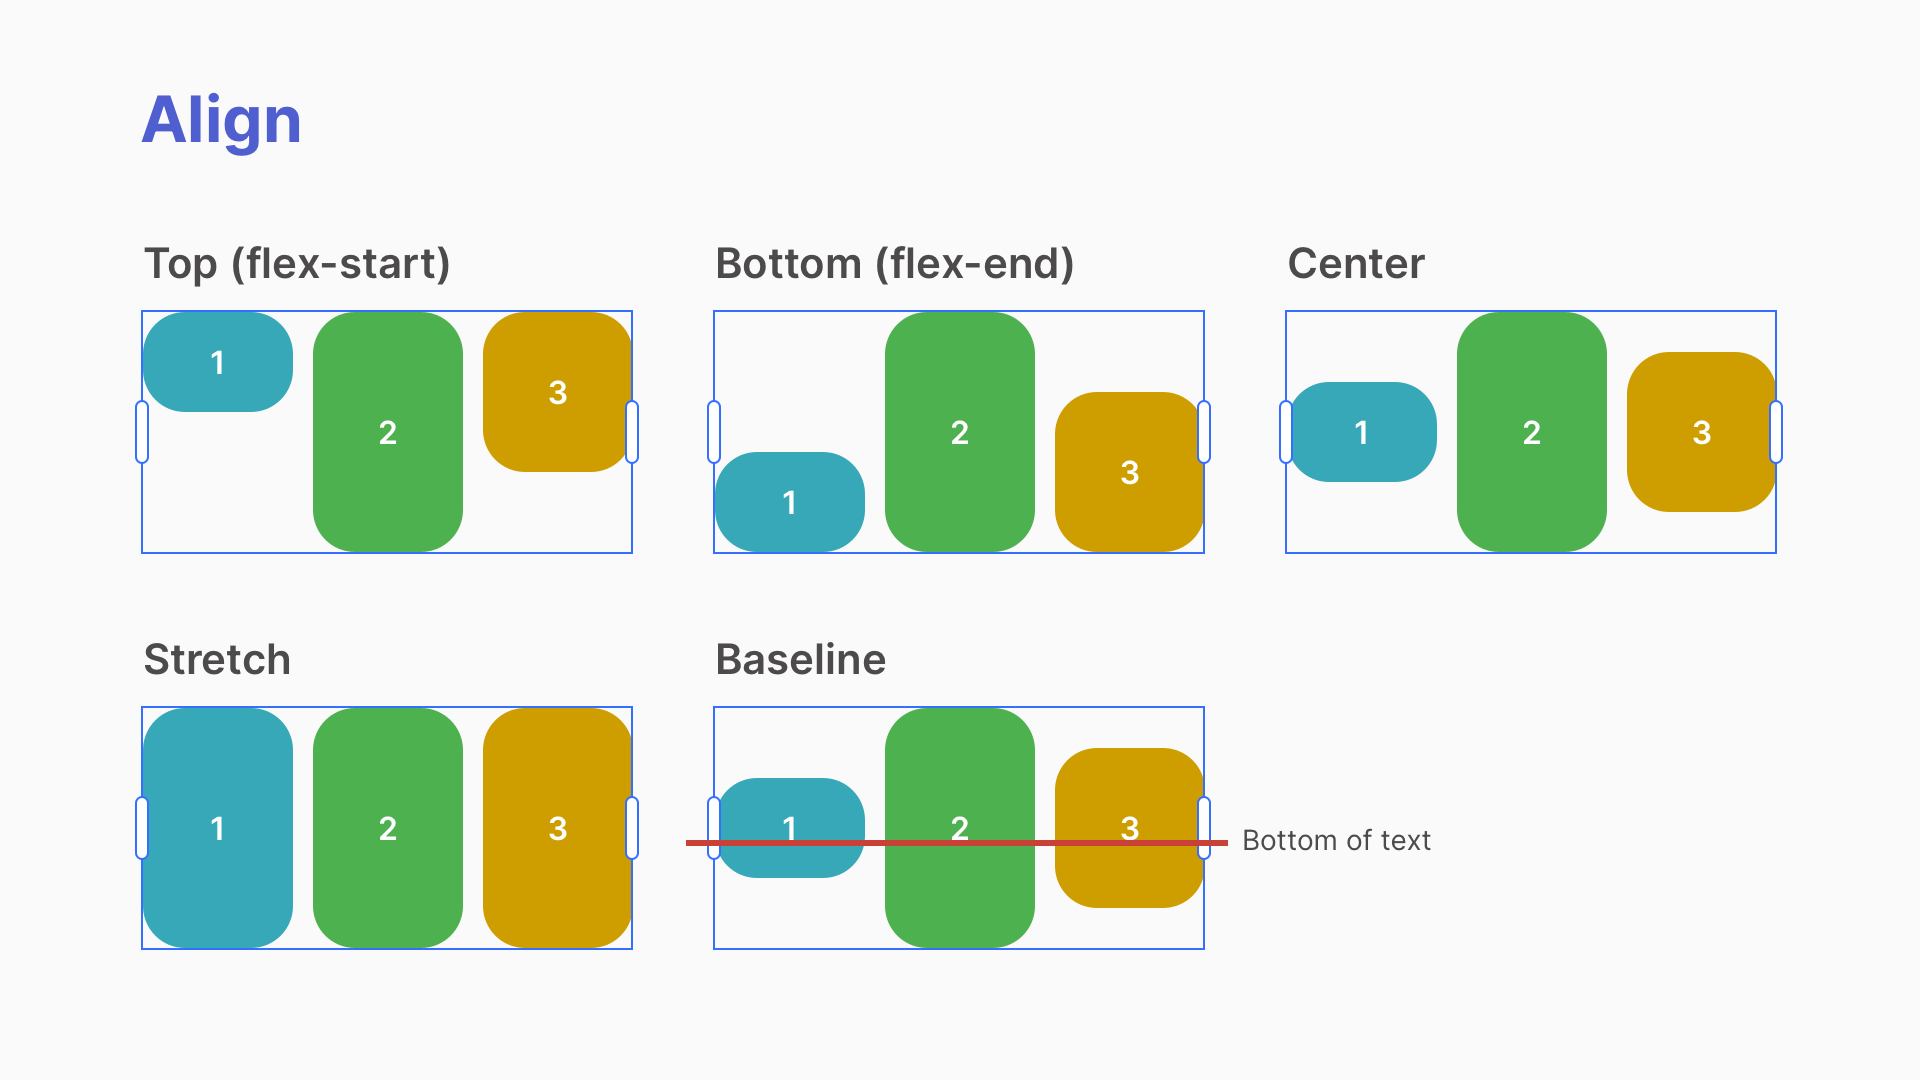
Align adjusts how the objects align vertically with each other. For example do you want objects to align along the top and bottom of each other or along a center axis. Here are the different options available:
Top (default) - All objects are aligned to the top of the layout.
Center - All objects are aligned to the vertical middle (center) of the layout.
Stretch - Objects except those with fixed heights (such as buttons, images and some embed codes) stretch to fill the overall height of the layout. The tallest object on the same row determines the height for each object in the row.
Bottom - All objects are aligned to the bottom of the layout.
Baseline - All objects in the layout are aligned to the text baseline (Baseline is the invisible line that text sits upon). This setting allows you to have text of varying sizes aligned horizontally with each other on the same invisible line.
Flexbox tip: If you are familiar with Flexbox, these are align-items attributes.
Justify content
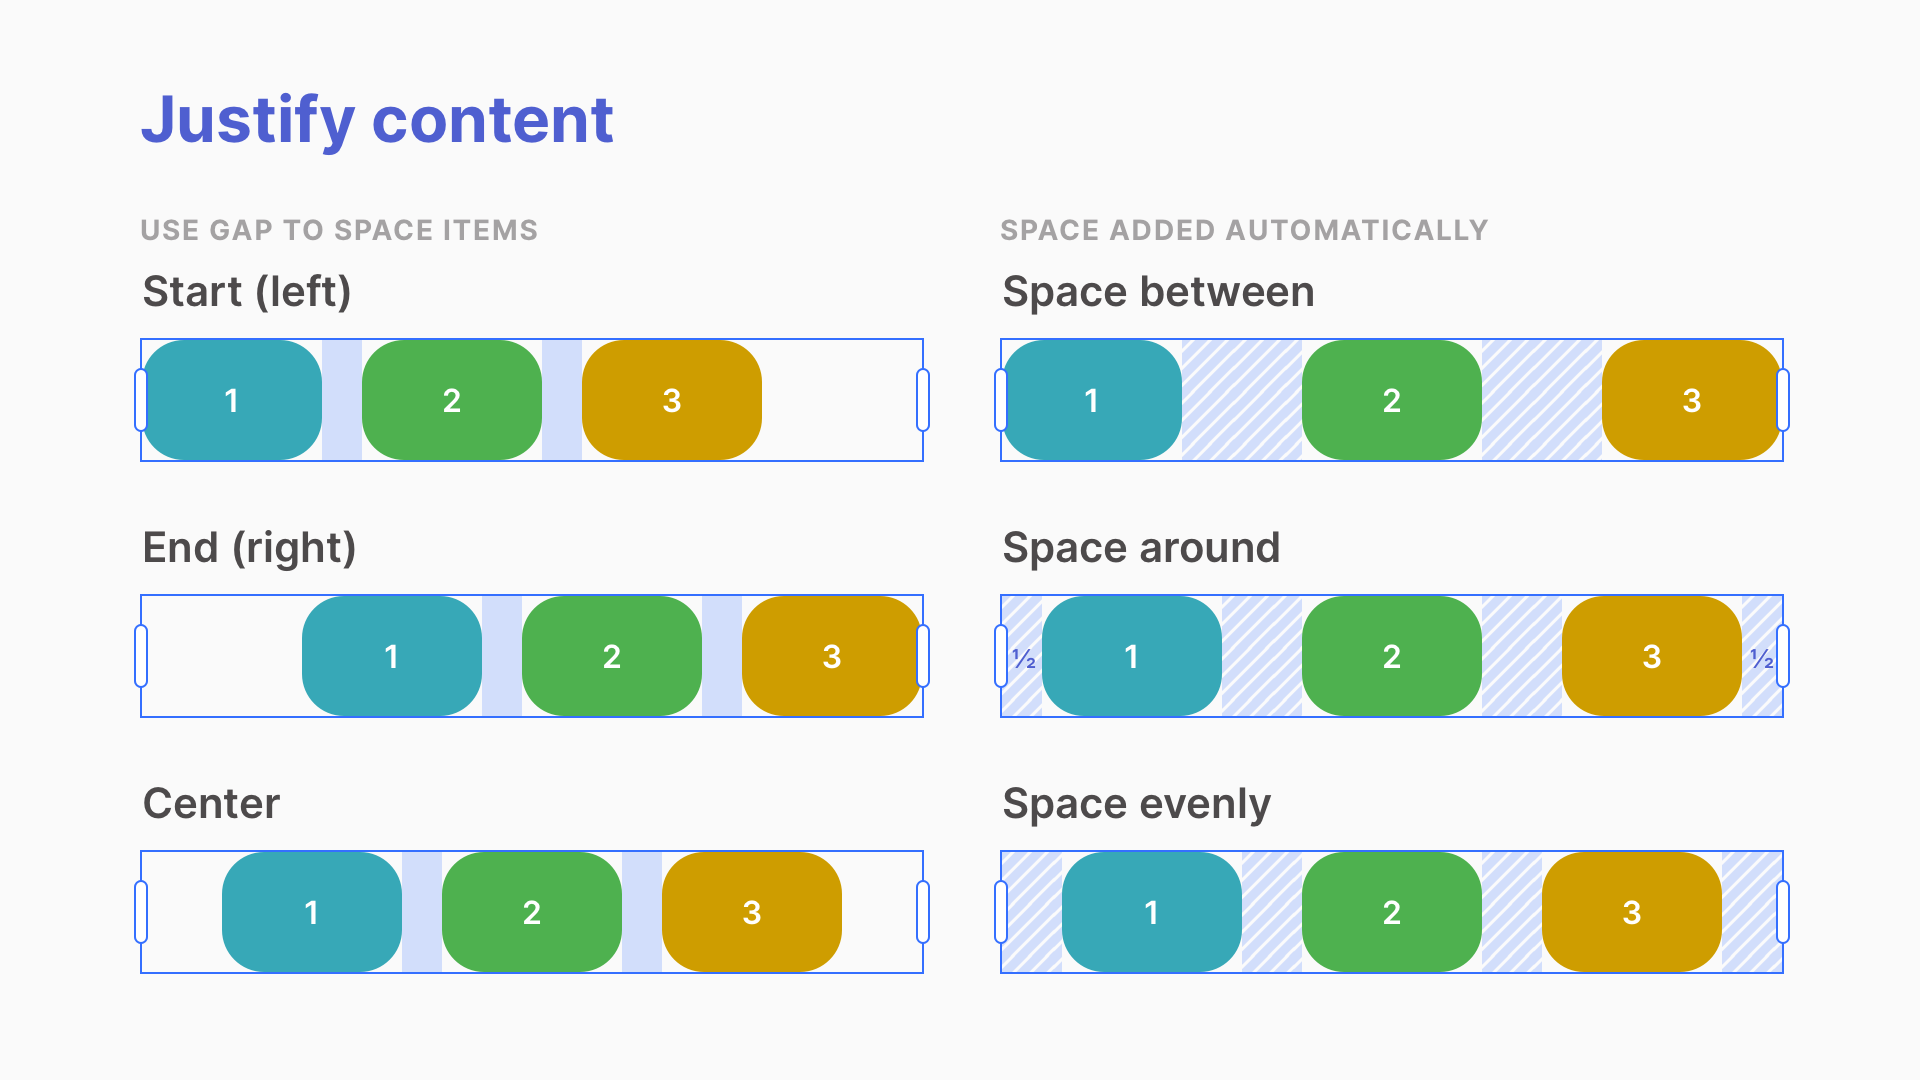
Justify content adjusts how the objects align vertically with the layout. For example, should objects align to the left, right, center or be evenly distributed.
No space added:
Start (default) - All objects are aligned to the left (start) of the layout.
Center - All objects are aligned in the center of the layout.
End - All objects are aligned to the right (end) of the layout.
Spaced automatically:
Space between - All objects are distributed evenly across the full width of the layout.
Space around- All objects are distributed evenly across the full width of the layout with an additional half space calculated between objects added at the start and end of the layout.
Space evenly- All objects are distributed evenly across the full width of the layout with an additional full space calculated between objects added at the start and end of the layout.
Note about space: These settings will have no impact when the total width of the child objects and gap (if applied) is equal to the layout width. This is the case when 1 or more objects is set to “Fill container”.